Cloning your HD on Windows
Table of Contents
After reading this great tutorial on how to clone your HD using a Mac, I decided to write a tutorial showing how to do this if you are a Windows user.
Lately I’ve been quite frustrated with Windows. Here’s a very easy and fast way to restore your Windows settings without having to reinstall Windows again.
Important Backup Considerations #
It’s not recommended to make a backup copy on the same hard drive for security reasons - if something goes wrong with your HD, your backup will also be lost. While you’ll be safe against software problems, you won’t be protected from hardware failures. That’s why the best backup options are:
- External hard drives
- CDs
- DVDs
- Other removable drives
You can also schedule your backups to run daily, weekly or monthly.
About DI2002 #
DI2002 works on:
- DOS
- Windows 95/98/Me
- Windows NT 4.0 Workstation
- Windows 2000 Professional
- Windows XP
And supports these filesystems:
- FAT
- FAT32
- NTFS
- Ext2 (Linux)
Creating and Restoring Backups #
There are two types of backups: user-specific files or HD cloning. DI2002 specializes in making an exact clone of the HD, creating a perfect copy with all files, configurations and registry settings at the exact moment the backup was created.
Note that you can’t create an image of specific files/directories (that’s what regular backup programs are for). DI2002 only supports complete partition images. This is why it’s good practice to have a separate partition (like Windows C:) just for programs and installation files.
Before making the image, verify that all programs and Windows are running correctly with the latest patches installed. Then follow these steps:
- Click “Create Image” (or “Restore Image” if restoring)
- On the next screen, select “Select Drives” and choose which disk/partition to copy
- Choose “Select Destination” and specify where to save the image - you can add a name and comments
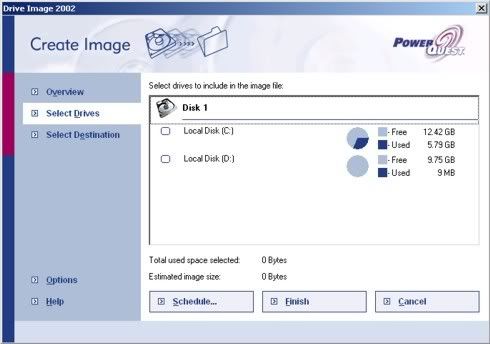
Click “Options” to configure:
- Compression level
- Password protection
- Split image into fixed size volumes (650MB for CD-R/RW, 4.7GB DVD-R/RW, etc)

After configuring options, click Finish and wait for DI2002 to create the image.
Restoring an Image #
Restoration is also straightforward:
- Click “Restore Image”
- Select the image file and restore location
- Optionally use “Restore to Original Locations” to restore to the exact same place where the image was made
If Windows isn’t working, you can use Rescue Diskettes that can be created:
- During DI2002 installation
- By clicking “Boot Disk Builder”
- From “Create Rescue Diskettes” in the Windows start menu (DI2002 folder)
This creates two boot disks:
- Boot disk
- DI2002 for DOS disk
To use them:
- Boot from the rescue disks
- Follow the same simple steps in DOS mode
- Select “Restore Image”, choose image location and restore location
- Reboot without the boot disk
Your computer will now be restored to the exact state when the backup was made!